Hi Crafty Friends!I hope everyone has wonderful plans for Christmas.We will have our kids, son-in-law, and grandson here, so we are very excited.I am loving the December release from Sweet n’ Sassy Stamps. This release has a NEW background stamp, the Diagonal Plaid Background stamp.I love background stamps so am always excited when new ones come out.This release also has another great basic die set, the Stitched Circles 2 die set.
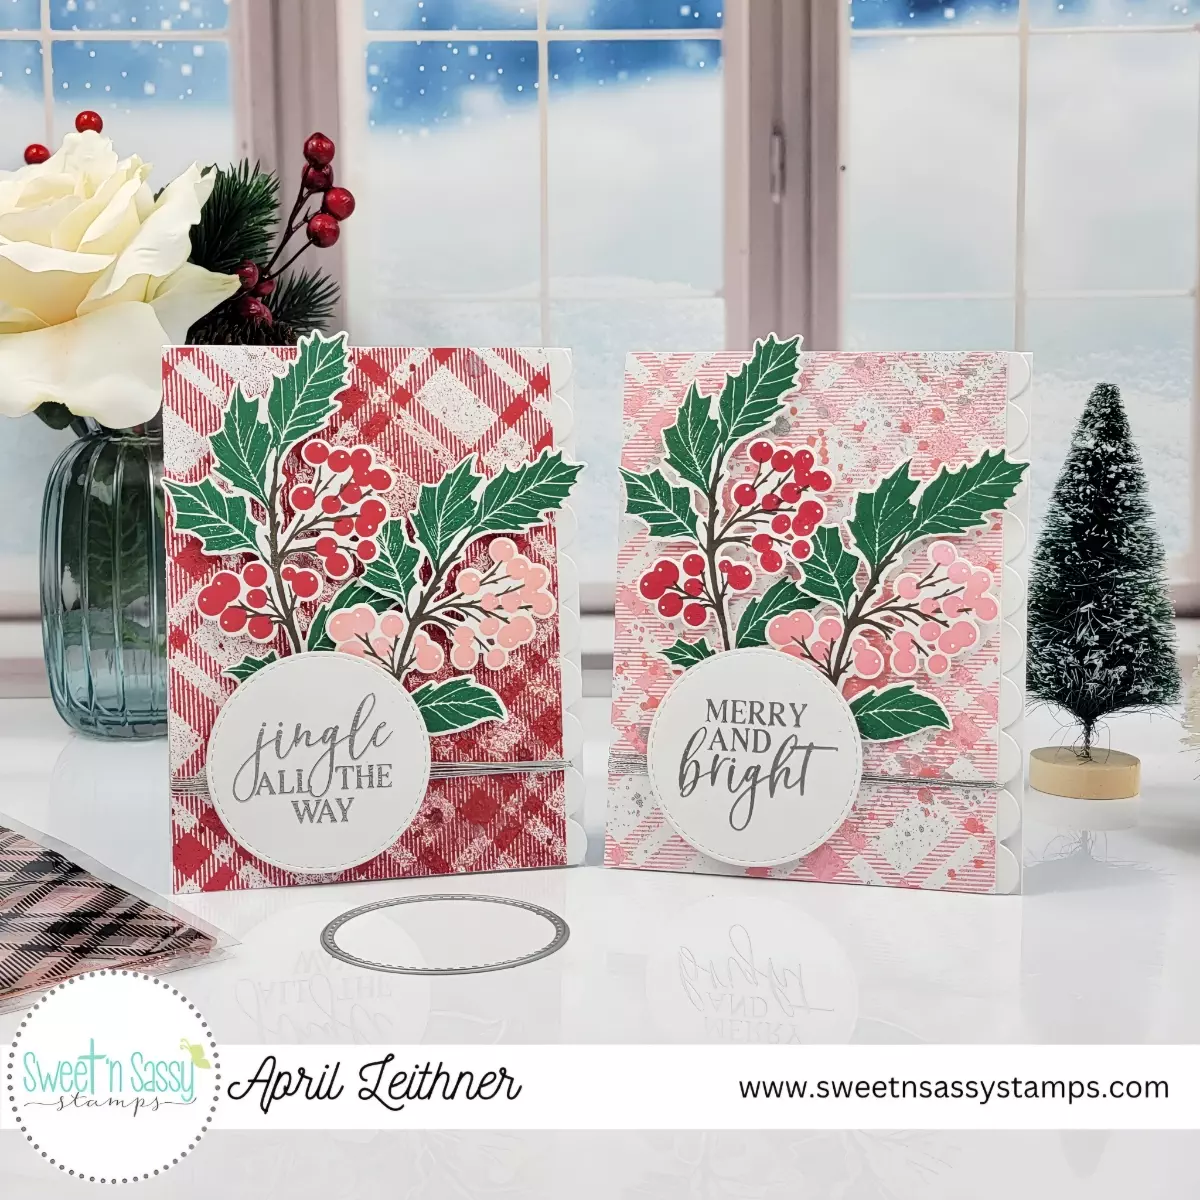
I created two cards today that are the same except for the ink colors used on them.I created my backgrounds using the Diagonal Plaid Background stamp.On one card, I used Cheeky Pawsitively Saturated Ink and the other I used Pink Fresh Studio Ink in Candy Apple.I then sprayed each lightly with Distress Mica Stain Spray in Sugary Gumdrop and Tart Cranberry.Both were sprayed with Frozen Fog Distress Mica Stain Spray as well.Make sure to wipe the nozzle of your spray stain bottle after spraying to help prevent any clogging.
I then trimmed both panels down to 4 x 5.5″.I used the Scallop Border Die to cut 2 strips which were placed on one edge of the plaid panel. This was adhered to the back of the panel with just the scallops showing.This is subtle but a beautiful detail.To make it pop a bit more, you could use a colored or glitter cardstock.

The Holly was die cut 4 times before stamping.Since the Holly is one solid die, it is easier to die cut first then stamp.I stamped the stems from the Vintage Holly Stamp Set in Mocha Pawsitively Saturated Ink and the leaves in Spruce Tips from Pink Fresh Studio.Each image had a different color of holly berries – Cheeky and Cherry Pawsitively Saturated Inks and Pink Fresh Studio Candy Apple and Coral Reef Inks.
I popped these up with foam squares and placed the holly stamped with Candy Apple and Coral Reef on the red plaid background.The Cheeky and Cherry were adhered to the pink plaid background.I then wrapped Silver DMC thread around the bottom portion of the card.I kept wrapping the thread around the panel until I was happy with the how it looked.
I heat embossed sentiments from the Christmas Sentiments Stamp Set with Silver Embossing Powder.Using one of the Stitched Circles 2 Dies, I die cut both sentiments.These were popped up over the thread and stems of the holly with foam squares.

To finish my card, I adhered both panels to a heavy weight top folding card base.I did leave the leaves hanging over the edge a little which is fine as I can use a 5×7″ envelope to mail these.
Thank you for stopping by, I hope you enjoyed these two cards, and I will see you next time.Happy crafting!April
–SUPPLIES–
Glassboard Studios 20% Discount Code INKY20
Glassboard Studios Discount Link https://www.glassboardstudio.com/discount/INKY20

**Affiliate links are used when available at NO EXTRA COST to you!Your support is very much appreciated.Thank you!**