Hi Crafty Friends!Today, I have a light up card using the Pear Blossom Press Halo Lights.Interactive cards are always fun but there is something extra special about a card that lights up and the Halo Light is even more special.Welcome to those that came here from the Pear Blossom Press Blog!This is my second post as a member of the Pear Blossom Press Design Team, and this company and their products are both awesome!I am so honored to be a part of this terrific team.
*ALL SUPPLIES ARE LISTED BELOW!!**
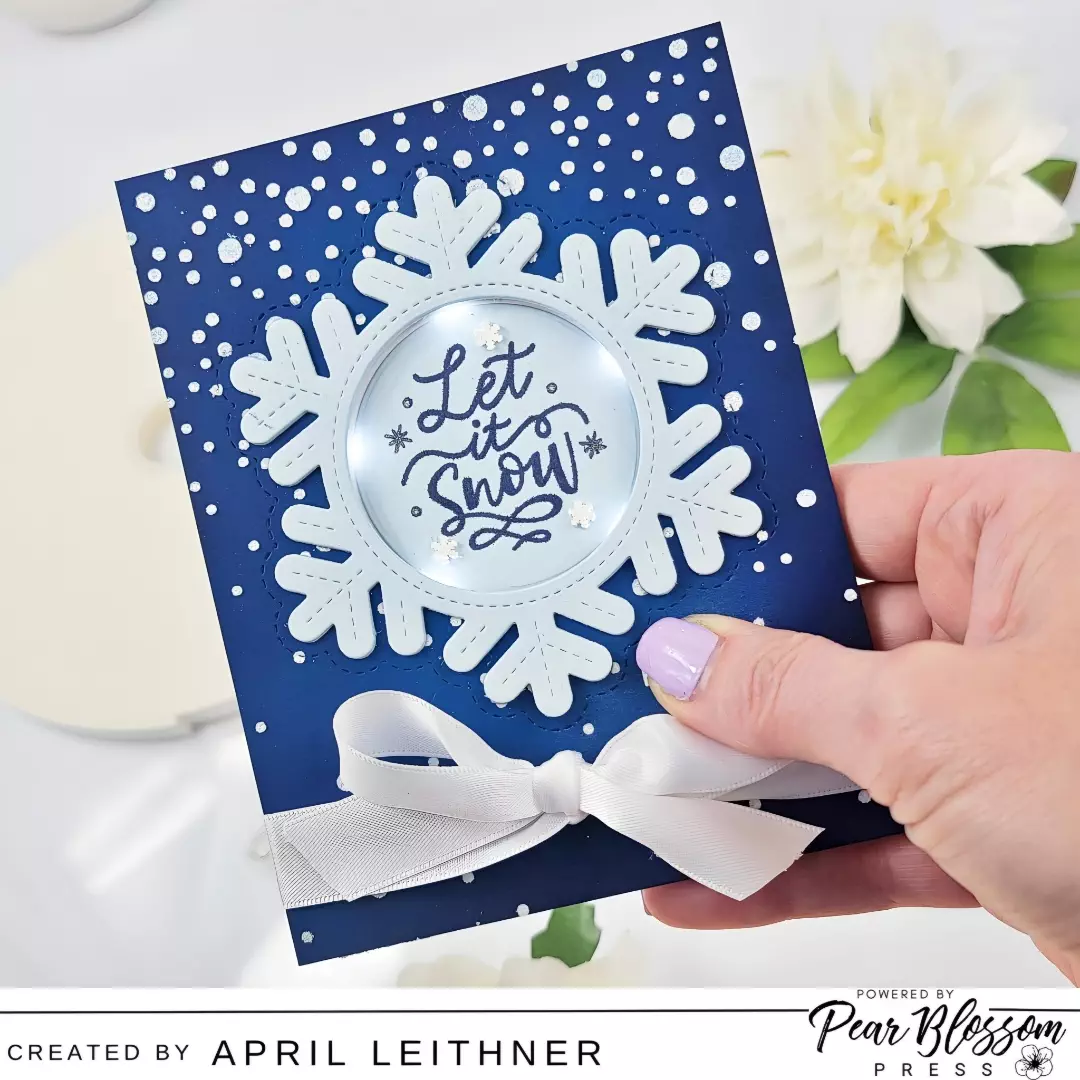
I began my card by creating my background panel.I love background panels and this snowy background is easy yet stunning.I ink blended Navy Fresh Dye Ink around the outside edges of an A2 piece (4.25×5.5″) of Cosmic Sky Essentials Cardstock. This is much easier to see in person then in a photo as it is subtle but helps to make this background so special.I then used the Falling Snow Stencil with Arctic Fox Paper Glaze Luxe over the panel.I cleaned the stencil, palette knife and my work surface immediately as the Paper Glaze dries really fast.

While the background panel dried. I die cut the large snowflake from the Outside In Stitched Snowflake three times from Glacier Essentials Cardstock. I then grabbed a circle die from the Nesting Circles Die Set to cut out the center of the snowflakes.I adhered the snowflakes together with liquid glue for some dimension and set the circles aside for later.

Using one of the circles that I die cut from the center of the snowflakes, I stamped my sentiment from the Magic Holiday Messages in Navy Fresh Dye Ink on it.I did change sentiments at the last moment, so I am glad I had extra circles for this.I used a Stardust Glitter Pen to go over the images around the “Let it Snow”.I also added a few clay snowflakes for some more interest.
Next, I die cut the large snowflake from the Outside In Stitched Snowflake Die Set in the upper portion of my dried background panel.The stacked light blue snowflake fits perfectly in this die cut area of the background.

I used the Halo Light and light blue snowflake to figure out where I needed to put “PUSH” on the front of the background panel.I put the battery in the light before I did this. I then used Unicorn White Ink and Opaque Bright White Super Fine Embossing Powder to heat emboss my stamped image from the Pear Blossom Stamp and Die Bundle.

I held my light blue snowflake in place in the background panel and carefully placed the Halo Light exactly where I wanted it so it was not visible and the button was directly under the “PUSH” on the front of the panel.Then I added the World’s Best Foam Tape to the back of the panel.This foam tape is the perfect thickness for all the lights from Pear Blossom Press.It is also re-positional for up to 30 minutes which allows you to get your lights exactly where you want them.I did make sure to put the foam tape right up next to my light to hold it securely in place.

Using my Misti, I placed my background panel in the corner with the foam tape’s release paper removed and placed a top folding heavy weight card base on the panel.This method allows you to get the panel perfectly placed every time.I then pressed my light blue snowflake down to make sure it was secured to the foam tape from the back.

Then I added some liquid adhesive to my sentiment circle and popped it down in the middle of the snowflake.Lastly, I added some white satin ribbon to the bottom of my card.

I love how this card looks with or without the Halo Light on.However, the Halo Light makes this card so extra special and whoever receives will love it when all lit up.Make sure to check out the Pear Blossom Press Blog, if you didn’t come from there.Thank you for stopping by and I will see you next time.Happy crafting!April
–SUPPLIES–
Glassboard Studios 20% Discount Code INKY20

**Affiliate links are used when available at NO EXTRA COST to you!Thank you for your support.You are very much appreciated!**